Linux 进程和线程
进程 进程的定义如下:
进程(Process)是指计算机已执行的程序,用户下达执行进程的命令后,就会产生进程。同一个程序可以产生多个进程(一对多),以允许同时有多个用户执行同一个程序,却不会相互冲突。进程需要一些资源才能完成工作,比如 CPU、内存、存储、文件以及 I/O 设备等。
这里说的程序,一般都是 ELF 格式的可执行文件。
ELF ELF(Executable and Linking Format) 一般有这几种格式:
可重定位文件
可执行文件
共享对象文件
内核转储文件
可重定位文件 可重定位文件(Relocatable File)包含适用于与其他目标文件链接来创建可执行文件或者共享目标文件的代码和数据,一般都是 *.o 文件,这个编译好的二进制文件里面,应该是代码,还有一些全局变量、静态变量等等。
为什么这里只有全局变量呢?是因为局部变量放到栈里面的,是程序运行过程中随时分配的空间,随时释放的,这里还是二进制文件,还没有启动,所以只有全局变量
这个编译好的代码和变量,将来加载到内存里面的时候,都是要加载到一定位置的。比如调用一个函数,其实就是跳到这个函数所在的代码位置执行;如果修改全局变量,也要到变量的位置那里修改。但是在这个时候,还是 *.o 文件,不是一个可直接运行的程序。所以 *.o 里面的位置是不确定的,但是必须是可重新定位的,因为它将来是要做函数库的,加载到哪里就重新定位这些代码、变量的位置。
可执行文件 可执行文件(Executable File)包含适合执行的一个程序,此文件规定了 exec() 如何创建一个程序的进程映像,即 *.out 文件。格式基本上和 *.o 文件大致相似,只不过有多个 *.o 合并过的。这个文件是可以直接加载到内存里面执行的文件了,在 ELF 头里面,有一项 e_entry,也是个虚拟地址,是这个程序运行的入口。一般断点调试的时候可以第一个断点标记到这里
1
2
3
4
5
6
7
8
9
10
11
12
13
14
15
16
17
18
19
20
21
22
$ docker run -it --rm --name centos centos:7.9.2009 [root@fe87ccfdbd0a /]# readelf -h /usr/bin/ls ELF Header: Magic: 7f 45 4c 46 02 01 01 00 00 00 00 00 00 00 00 00 Class: ELF64 Data: 2's complement, little endian Version: 1 (current) OS/ABI: UNIX - System V ABI Version: 0 Type: EXEC (Executable file) Machine: AArch64 Version: 0x1 Entry point address: 0x404aa8 Start of program headers: 64 (bytes into file) Start of section headers: 136320 (bytes into file) Flags: 0x0 Size of this header: 64 (bytes) Size of program headers: 56 (bytes) Number of program headers: 9 Size of section headers: 64 (bytes) Number of section headers: 30 Section header string table index: 29
通过 readelf 可以查看到这个 Entry point address
共享对象文件 共享对象文件(Shared Object File)包含可在两种上下文中链接的代码和数据,首先链接编译器可以将它和其它重定位文件和动态链接库一起处理,生成另外一个目标文件。其次,动态链接器(Dynamic Linker)可能将它与某个可执行文件以及其它共享对象文件一起组合,创建进程映像。即 *.so 文件。
内核转储 内核转储(core dumps)存放当前进程的执行上下文,用于 dump 信号触发。
知道了 ELF 这个格式,这个时候它还是一个程序,需要加载到内存里面。
启动进程 在内核中,有这样一个数据结构,用来定义加载二进制文件的方法:
include/linux/binfmts.h 1 2 3 4 5 6 7 8 9 10 11 12 13 14 struct linux_binfmt { struct list_head lh ; struct module *module ; int (*load_binary)(struct linux_binprm *); int (*load_shlib)(struct file *); #ifdef CONFIG_COREDUMP int (*core_dump)(struct coredump_params *cprm); unsigned long min_coredump; #endif } __randomize_layout;
对于 ELF 文件格式,有对应的实现
fs/binfmt_elf.c 1 2 3 4 5 6 7 8 9 static struct linux_binfmt elf_format = .module = THIS_MODULE, .load_binary = load_elf_binary, .load_shlib = load_elf_library, #ifdef CONFIG_COREDUMP .core_dump = elf_core_dump, .min_coredump = ELF_EXEC_PAGESIZE, #endif };
可以看到最终是通过 load_elf_binary 加载的,这里就不继续深入了。
创建进程 使用代码来创建进程
process.c 1 2 3 4 5 6 7 8 9 10 11 12 13 14 15 16 17 18 19 20 21 #include <stdio.h> #include <stdlib.h> #include <unistd.h> #include <sys/wait.h> int main (int argc, char *argv[]) { printf ("hello world (pid:%d)\n" , (int )getpid()); int rc = fork(); if (rc < 0 ) { fprintf (stderr , "fork failed\n" ); exit (1 ); } else if (rc == 0 ){ printf ("hello, I am child (pid:%d)\n" ,(int )getpid()); } else { int wc = wait(NULL ); printf ("hello, I am parent of %d (wc:%d) (pid:%d)\n" , rc, wc, (int )getpid()); } return 0 ; }
运行程序
1 2 3 4 5 [root@ec2c598cce50 /]# gcc process.c -o process [root@ec2c598cce50 /]# ./process hello world (pid:115) hello, I am child (pid:116) hello, I am parent of 116 (wc:116) (pid:115)
可以看到上面的父进程通过 fork 这个系统调用创建了子进程。如果在上面添加一个休眠,就可以通过 ps 查看到两个进程
process.c 1 2 3 4 5 6 7 8 9 10 11 12 13 14 15 16 17 18 19 20 21 22 #include <stdio.h> #include <stdlib.h> #include <unistd.h> #include <sys/wait.h> int main(int argc, char *argv[]) { printf("hello world (pid:%d)\n", (int)getpid()); int rc = fork(); if (rc < 0) { fprintf(stderr, "fork failed\n"); exit(1); } else if (rc == 0){ printf("hello, I am child (pid:%d)\n",(int)getpid()); + sleep(10); } else { int wc = wait(NULL); printf("hello, I am parent of %d (wc:%d) (pid:%d)\n", rc, wc, (int)getpid()); } return 0; }
继续运行发现不会退出,因为 wait(NULL),父进程需要等待子进程退出,所以通过 ps 查看进程
1 2 3 4 5 6 7 8 9 10 [root@ec2c598cce50 /]# ps -ef UID PID PPID C STIME TTY TIME CMD root 1 0 0 5月28 ? 00:00:16 /usr/lib/systemd/systemd --switched-root --system --deserialize 21 root 2 0 0 5月28 ? 00:00:00 [kthreadd] root 3 2 0 5月28 ? 00:00:00 [rcu_gp] root 4 2 0 5月28 ? 00:00:00 [rcu_par_gp] ...... root 148 1 0 09:10 pts/0 00:00:00 ./process root 149 148 0 09:10 pts/0 00:00:00 ./process root 150 117 0 09:10 pts/1 00:00:00 ps -ef
可以看到 148、149 都是 process 这个进程,只不过,148 的 PPID 是 1,而 149 的 PPID 是 148(父进程)。还可以看到 1 号进程的父进程是 0 号进程,而 2 号进程的父进程也是 0 号进程。那么这里的 0,1,2 号进程是什么呢?在系统中有什么作用?
特殊进程 0, 1, 2 号进程是 Linux 系统初始化的时候创建的三个进程,初始化的函数在 start_kernel 这里
init/main.c 1 2 3 4 5 6 7 8 9 10 11 12 13 14 15 16 17 18 19 asmlinkage __visible void __init __no_sanitize_address start_kernel (void ) { char *command_line; char *after_dashes; set_task_stack_end_magic(&init_task); smp_setup_processor_id(); debug_objects_early_init(); init_vmlinux_build_id(); cgroup_init_early(); arch_call_rest_init(); prevent_tail_call_optimization(); }
0 号进程 通过 init/main.c 的 start_kernel 代码,可以看到有一行 set_task_stack_end_magic(&init_task),其中 init_task 定义如下:
init/init_task.c 1 2 3 4 5 struct task_struct init_task
它是系统创建的第一个进程,称为 0 号进程,这是唯一一个没有通过 fork 或者 kernel_thread 产生的进程,是进程列表的第一个。
1 号进程 通过 init/main.c 的 start_kernel 代码,可以看到有一行 arch_call_rest_init()
init/main.c 1 2 3 4 5 6 7 8 9 10 11 12 13 14 15 16 17 18 19 20 21 22 23 24 25 26 27 28 29 30 31 32 void __init __weak arch_call_rest_init (void ) { rest_init(); } noinline void __ref rest_init (void ) { struct task_struct *tsk ; int pid; rcu_scheduler_starting(); pid = user_mode_thread(kernel_init, NULL , CLONE_FS); rcu_read_lock(); tsk = find_task_by_pid_ns(pid, &init_pid_ns); tsk->flags |= PF_NO_SETAFFINITY; set_cpus_allowed_ptr(tsk, cpumask_of(smp_processor_id())); rcu_read_unlock(); numa_default_policy(); pid = kernel_thread(kthreadd, NULL , CLONE_FS | CLONE_FILES); }
可以看到 arch_call_rest_init 最终调用了 rest_init,rest_init 第一大工作就是使用 user_mode_thread(kernel_init, NULL, CLONE_FS) 创建第二个进程,这个就是 1 号进程。对于 Linux 操作系统来说,有“划时代”的意义。因为它将运行一个用户进程,这意味着后续的用户进程可以通过这个进程创建,从而形成一颗进程树。可以看到传入的第一个参数 kernel_init 是一个函数
init/main.c 1 2 3 4 5 6 7 8 9 10 11 12 13 14 15 16 17 18 19 20 21 22 23 24 25 26 27 28 29 30 31 32 33 34 35 36 37 38 39 40 41 42 43 44 45 46 47 48 49 50 51 52 53 54 55 56 57 58 59 60 61 62 63 64 65 66 67 68 69 70 71 72 73 static char *ramdisk_execute_command = "/init" ;static int __ref kernel_init (void *unused) { if (ramdisk_execute_command) { ret = run_init_process(ramdisk_execute_command); if (!ret) return 0 ; pr_err("Failed to execute %s (error %d)\n" , ramdisk_execute_command, ret); } if (execute_command) { ret = run_init_process(execute_command); if (!ret) return 0 ; panic("Requested init %s failed (error %d)." , execute_command, ret); } if (CONFIG_DEFAULT_INIT[0 ] != '\0' ) { ret = run_init_process(CONFIG_DEFAULT_INIT); if (ret) pr_err("Default init %s failed (error %d)\n" , CONFIG_DEFAULT_INIT, ret); else return 0 ; } if (!try_to_run_init_process("/sbin/init" ) || !try_to_run_init_process("/etc/init" ) || !try_to_run_init_process("/bin/init" ) || !try_to_run_init_process("/bin/sh" )) return 0 ; panic("No working init found. Try passing init= option to kernel. " "See Linux Documentation/admin-guide/init.rst for guidance." ); } static int run_init_process (const char *init_filename) { const char *const *p; argv_init[0 ] = init_filename; pr_info("Run %s as init process\n" , init_filename); pr_debug(" with arguments:\n" ); for (p = argv_init; *p; p++) pr_debug(" %s\n" , *p); pr_debug(" with environment:\n" ); for (p = envp_init; *p; p++) pr_debug(" %s\n" , *p); return kernel_execve(init_filename, argv_init, envp_init); } static int try_to_run_init_process (const char *init_filename) { int ret; ret = run_init_process(init_filename); if (ret && ret != -ENOENT) { pr_err("Starting init: %s exists but couldn't execute it (error %d)\n" , init_filename, ret); } return ret; }
可以看到调用过程,先尝试运行 ramdisk 的 /init,或者普通文件系统上的 /sbin/init, /etc/init, /bin/init, /bin/sh(不同版本的 Linux 会选择不同的文件启动),只要有一个启动起来就行了。
最终调用的流程:
flowchart LR
kernel_execve --> bprm_execve
bprm_execve --> exec_binprm
exec_binprm --> search_binary_handler
search_binary_handler --> load_binary可以看到 load_binary 的 ELF 实现就是 load_elf_library,最终调用 start_thread
arch/x86/kernel/process_32.c 1 2 3 4 5 6 7 8 9 10 11 12 13 14 void start_thread (struct pt_regs *regs, unsigned long new_ip, unsigned long new_sp) { loadsegment(gs, 0 ); regs->fs = 0 ; regs->ds = __USER_DS; regs->es = __USER_DS; regs->ss = __USER_DS; regs->cs = __USER_CS; regs->ip = new_ip; regs->sp = new_sp; regs->flags = X86_EFLAGS_IF; } EXPORT_SYMBOL_GPL(start_thread);
这里的 pt_regs 就是寄存器,这个结构就是在系统调用的时候,内核中保存用户态上下文的,里面将用户态的代码段 CS 设置为 __USER_CS,将用户态的数据段 DS 设置为 __USER_DS,以及指令指针寄存器 IP、栈指针寄存器 SP,这里相当于补上了系统调用里,保存寄存器的步骤。所以这里执行完成之后,就回到用户态了。所以是相当于从内核态执行了 exec 生成了 1 号进程,执行完成后,1 号进程从内核态返回用户态并最终运行在用户态,成为了用户态进程的祖先。
2 号进程 通过 init/main.c 的 rest_init 第二个工作就是通过 kernel_thread(kthreadd, NULL, CLONE_FS | CLONE_FILES) 创建 2 号进程,这里的 thread 可以翻译成线程,这也是 Linux 操作系统很重要的一个概念。2 号进程管理所有的内核态的进程,kthreadd 负责所有内核态的线程的调度和管理,是内核态所有线程运行的祖先。
线程 从用户态来看,进程就是把一个可执行程序启动起来,这个进程包含很多资源,一般一个进程需要有多个模块执行不同或相同的任务,这就叫多线程(Multithreading)。如果只有一个线程,那它就是进程的主线程(一般项目的 main 函数所在的线程)。但是从内核态来看,无论是进程还是线程,都可以统称为任务(Task),都使用相同的数据结构,放在同一个链表中。
为什么要有线程 其实对于人一个进程来讲,即便没有主动创建线程,进程也是默认有一个主线程的。线程是负责执行二进制指令的,进程要比线程管的多,除了要执行指令外,内存、文件系统等都需要进程来管理。进程相当于一个项目,而线程就是为了完成项目需求,而建立的一个个开发任务
创建线程 thread.c 1 2 3 4 5 6 7 8 9 10 11 12 13 14 15 16 17 18 19 20 21 22 23 24 25 26 27 28 29 30 31 32 33 34 35 36 37 38 39 40 41 42 43 44 45 46 47 #include <stdio.h> #include <assert.h> #include <pthread.h> static volatile int counter = 0 ;static pthread_mutex_t lock;void *mythread (void *arg) { printf ("%s: begin\n" , (char *)arg); int i; pthread_mutex_lock(&lock); for (i = 0 ; i < 1e7 ; i++) { counter++; } pthread_mutex_unlock(&lock); printf ("%s: done\n" , (char *)arg); pthread_exit((void *)mythread); } int main (int argc, char *argv[]) { pthread_t p1, p2; int rc; rc = pthread_mutex_init(&lock, NULL ); assert(rc == 0 ); pthread_attr_t thread_attr; pthread_attr_init(&thread_attr); pthread_attr_setdetachstate(&thread_attr, PTHREAD_CREATE_JOINABLE); printf ("main: begin (counter = %d)\n" , counter); rc = pthread_create(&p1, &thread_attr, mythread, "A" ); assert(rc == 0 ); rc = pthread_create(&p2, &thread_attr, mythread, "B" ); assert(rc == 0 ); pthread_attr_destroy(&thread_attr); rc = pthread_join(p1, NULL ); assert(rc == 0 ); rc = pthread_join(p2, NULL ); assert(rc == 0 ); printf ("main: done with both (counter = %d)\n" , counter); pthread_mutex_destroy(&lock); pthread_exit(NULL ); }
由于 pthread 库不是标准 Linux 库,所以需要使用 gcc thread.c -l pthread 来编译
1 2 3 4 5 6 7 8 [root@ec2c598cce50 tmp]# gcc thread.c -l pthread [root@ec2c598cce50 tmp]# ./a.out main: begin (counter = 0) B: begin A: begin B: done A: done main: done with both (counter = 20000000)
一个普通线程的创建和运行过程:
声明线程函数
void *mythread(void *arg) {
声明线程对象
pthread_t p1, p2;
设置线程属性
pthread_attr_t thread_attr;
创建线程
rc = pthread_create(&p1, &thread_attr, mythread, “A”); assert(rc == 0);
子线程开始
void *mythread(void *arg)
子线程结束
pthread_exit
销毁线程属性
pthread_attr_destroy(&thread_attr);
等待线程结束
rc = pthread_join(p1, NULL); assert(rc == 0);
主线程结束
pthread_exit(NULL);
数据 线程可以将进程并行起来,加快进度,但是也会带来负面影响,过程并行了,数据应该如何“并行”?
本地数据 线程上的本地数据,比如函数执行过程中的局部变量。每个线程都有自己的栈空间,栈的大小可以通过命令 ulimit -a 查看
1 2 3 4 5 6 7 8 9 10 11 12 13 14 15 16 17 [root@ec2c598cce50 tmp]# ulimit -a core file size (blocks, -c) 0 data seg size (kbytes, -d) unlimited scheduling priority (-e) 0 file size (blocks, -f) unlimited pending signals (-i) 31345 max locked memory (kbytes, -l) 64 max memory size (kbytes, -m) unlimited open files (-n) 1048576 pipe size (512 bytes, -p) 8 POSIX message queues (bytes, -q) 819200 real-time priority (-r) 0 stack size (kbytes, -s) 8192 cpu time (seconds, -t) unlimited max user processes (-u) unlimited virtual memory (kbytes, -v) unlimited file locks (-x) unlimited
默认 stack size 大小为 8192(8MB),可以通过 ulimit -s 修改。对于线程栈,可以通过 pthread_attr_t 修改线程栈的大小
1 int pthread_attr_setstacksize (pthread_attr_t *attr, size_t stacksize) ;
主线程在内存中有一个栈空间,其它线程也拥有独立的栈空间。为了避免线程之间的栈空间踩踏,线程栈之间还会有一小块区域,用来隔离保护各自的栈空间。一旦另一个线程踏入到这个隔离区,就会引发段错误(SegmentFault)。
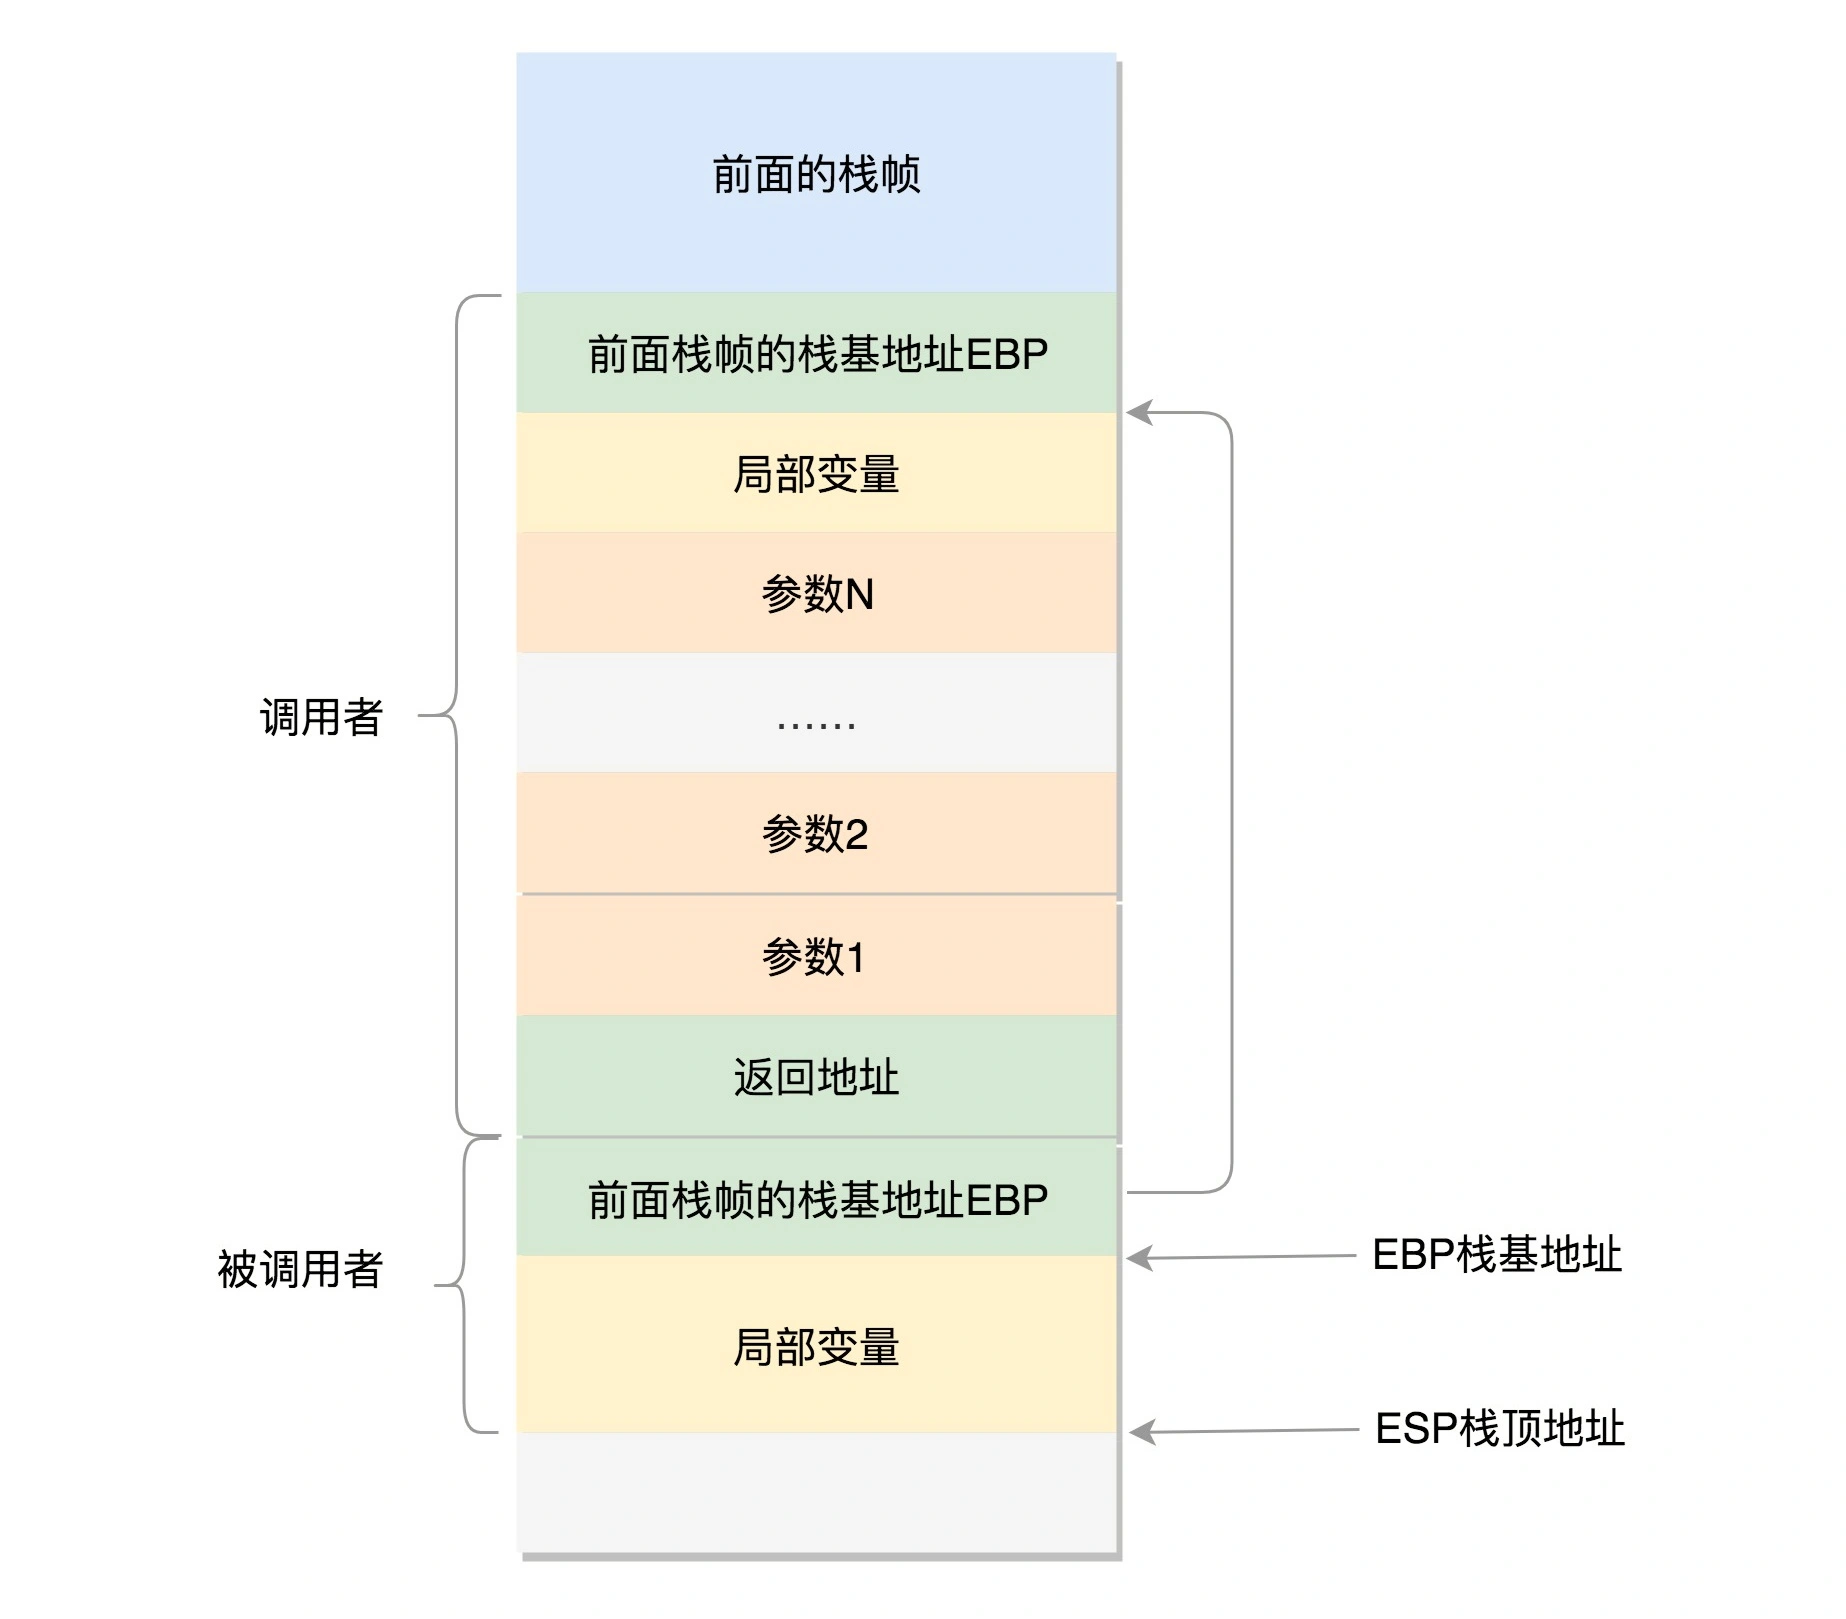
线程函数调用的压栈过程:
全局数据 在整个进程里共享的全局数据,例如全局变量,虽然在不同进程中是隔离的,但是在一个进程中是共享的。如果同一个全局变量,两个线程一起修改,那肯定会有问题。这就需要有一种机制来保护顺序,让运行结果可预期。可以通过加锁或者信号量等一些办法来控制。
私有数据 可以通过 pthread_key_create 创建
1 int pthread_key_create (pthread_key_t *key, void (*destructor)(void *))
创建一个 key,的同时,会传入一个析构函数(释放资源的时候执行的函数)。key 一旦被创建,所欲呕线程都可以访问它,但各个线程可以根据自己的需要往 key 中填入不同的值,这就相当于提供了一个同名而不同值的全局变量。
1 2 3 4 int pthread_setspecific (pthread_key_t key, const void *value) void *pthread_getspecific (pthread_key_t key)
在 Linux 里面,无论是进程还是线程,到了内核里面,统一都叫任务(Task),由一个统一的结构体 task_struct 进行管理。接下来将继续学习任务的调度。
参考链接: